
 As the number of email phishing attacks continue to rise, email providers are understandably beginning to tighten protocols around both sending and receiving messages. A few years ago, some of the more technical setup steps might have been viewed as extra credit efforts by some, but today let’s explore a few settings that should now become higher priorities for your business email setup. The following tips will help make sure your messages don’t say they were sent “via” someone else!
Perhaps Not All Nigerian Princes Are Scammers
When someone sends an email through a server, all that is usually required are a few lines of code to specify the raw components of an email. For example, if your web server runs on PHP, you might see a script like the following:
<?php

// Step 1: Define the Variables
$to = "somebody@example.com";
$subject = "My Subject";
$message = "Hello World!";
$headers = "From:[email protected]";

// Step 2: This Part Actually Sends the Email
mail($to,$subject,$message,$headers);

?>
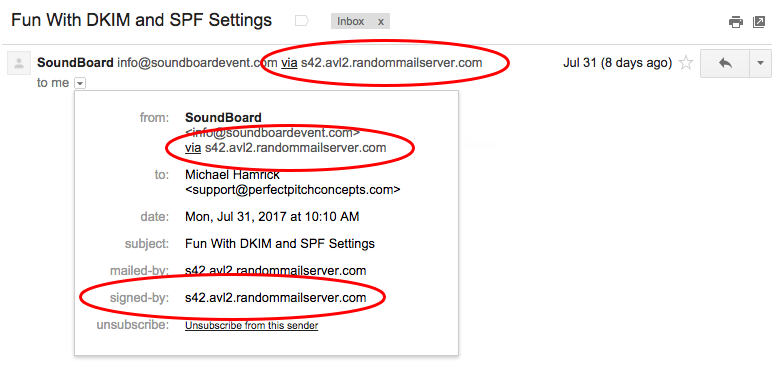
Notice how the “headers” component allows you to define who the email is “from” when you compose and send it? Most web servers will just deliver your message as-is, and it will be up to the recipient’s email service to decide whether or not the message is spam.
So what’s to stop a spammer from sending an email from “support@amazon.com” and pretending to be an Amazon representative to get someone’s personal credentials? Or what if some scammer assumed the identity of a Nigerian Prince? Well, there’s really nothing to prevent this. You can technically send emails from anyone you can imagine.
Email services aren’t as naive as they used to be when it comes to receiving messages, however, and the good ones all now closely examine every single inbound message. If something claims to be from “support@amazon.com” but originated from somewhere suspicious, it’s likely to get marked as spam right away or possibly even just rejected entirely.
But wouldn’t it be easier if the owner of the domain could just authorize only their servers to help everyone know who was allowed to send on their behalf?
Verified Sending Domains
If you are using an email marketing platform like MailChimp or a transactional email service like Mandrill, then the first thing you’ll have to do is verify that you have access to the email address from which you wish to send messages.
You’ll enter your email address, they’ll email you a verification message, and you’ll then provide the token or code they send. Pretty standard stuff, and it’s a straightforward way to make sure that a reputable service isn’t getting tricked into sending phishing emails pretending to be from places they’re not.
But now MailChimp has to have a way to verify to other email services that messages it sends are really coming from them, to prevent people from just pretending to be MailChimp.
DKIM & SPF Authentication
Thanks to Sender Policy Framework (SPF) and DomainKeys Identified Mail (DKIM) authentication protocols, email providers are able to check inbound messages at the domain level to see if sending domain has actually authorized the sender to deliver email on its behalf.
They each do slightly different things, but as far as this post is concerned the key takeaway is that each of them helps to authenticate messages you send but first require a modification to your domain’s Domain Name Server (DNS) records. DNS records are controlled by the domain owner, so it’s the only way for services to determine whether something is authorized or not.
Whenever a service like MailChimp sends something on your behalf, they are basically signing it themselves and informing recipients that they are sending it on your behalf. Since they are reputable services, most email hosts will allow these messages to pass through. But they often add a note to these messages to indicate that they were sent “via” a particular service.
Removing “Via” From Your Company Emails
Fortunately, removing this small flag from messages you send isn’t terribly difficult and will make your emails come across as more polished and trustworthy. Though it does require that you create SPF and DKIM records for your own domain so that your service can start “signing” messages directly as you instead of as themselves. In a nutshell.
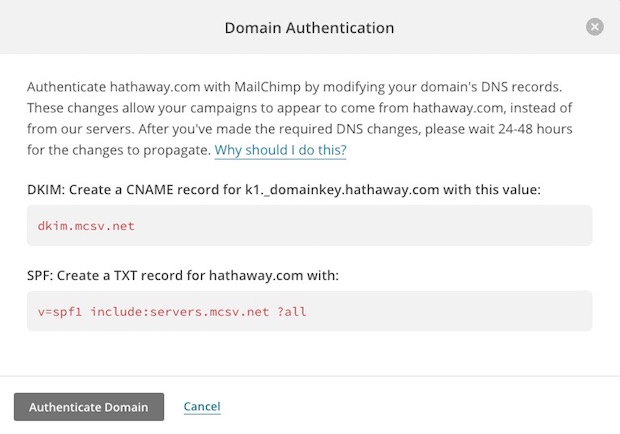
The exact DNS changes you need to make will vary depending on the email sending service you’re trying to authorize. But most services will have specific setup guides for you to follow. This MailChimp guide offers a great example:
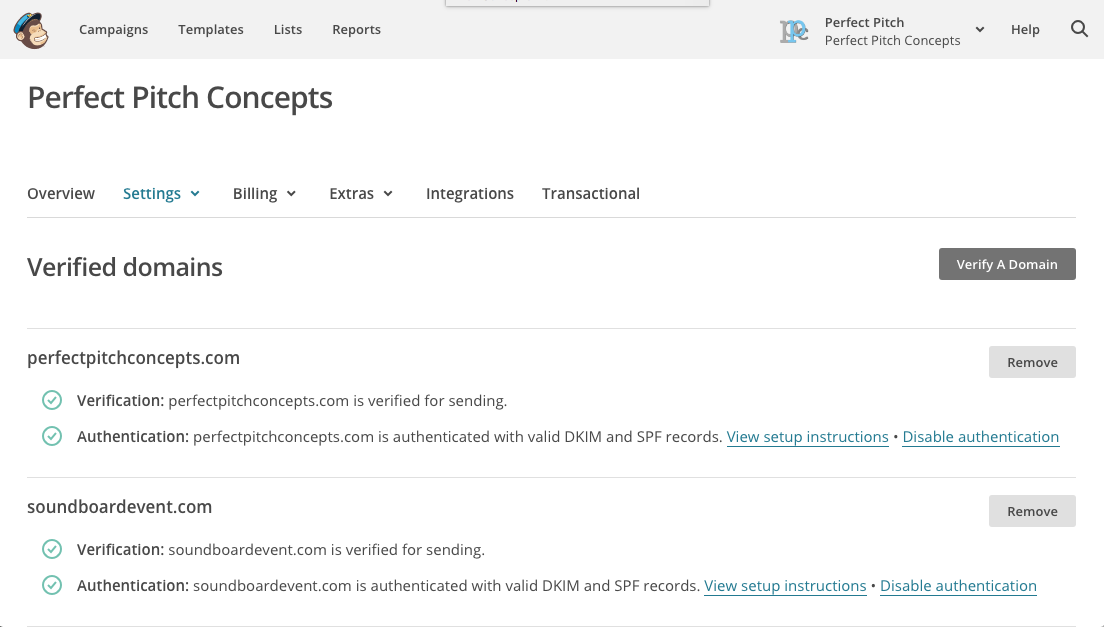
Specifically for MailChimp, you want to make sure your “Verified Domains” screen looks something like this, with no warning signs or complaints about a domain not being fully authenticated:
You can troubleshoot your own DNS settings either using internal verification tools provided by your email service, or by using an online SPF testing tool and the DKIMCore validator.
Why Bother With This?
In most cases, this extra setup isn’t technically required. You are usually able to send emails through many services as long as you’ve simply verified your address.
If you’re using a service like MailChimp that’s signing the messages on your behalf with their own authentication settings then your SPF and DKIM settings will still likely PASS, even if it is passing using a domain other than yours. Regardless, this will usually be enough to get your message delivered to your recipients.
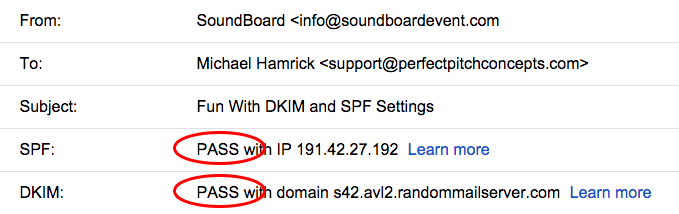
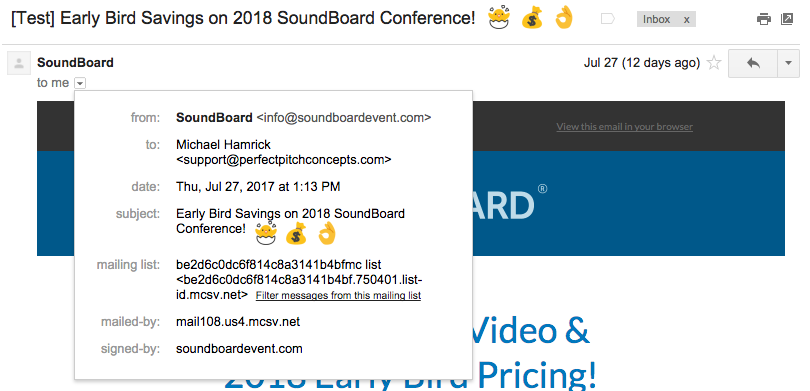
You can click “see headers” or “see original” on your message in most email programs to look at the results of these tests on most message. You want to make sure your messages are saying “PASS” here. Here is an example of a message that passes the authentication tests by relying on a service signing for them (it’s a fake service made up for the example, so it wouldn’t actually validate IRL).
Getting your SPF and DKIM settings to “PASS” will probably get you into the inbox of your recipient. But as we’ve mentioned a few times already in this post, if you are using a service that’s signing messages themselves and just sending on your behalf, then you’re still going to have that sent “via” message in the “From” area on your message.
Honestly, a lot of people may not even notice this! But as people are becoming more savvy about spammers and scammers, the people who do notice are more likely to get spooked by anything that looks remotely out of the ordinary. Even though the “via” message is perfectly legit, why risk confusing or scaring your readers away when it can be easily removed with a few simple DNS updates?
Here is an example of how the email changes when properly authenticated:
The “mailed by” parameter won’t be changed by these DNS updates, but that’s OK. We’re just looking to remove that “via” element and to make sure that our domain is “signing” the message!
Where This Matters
Most of this post has focused on email marketing platforms like MailChimp. That’s definitely an area in which you want to lock down your SPF and DKIM settings, but this really matters for anything that sends email “from” any address that uses “@yourcompany.com” as the sending domain.
We’ve seen clients using services like Google Apps, or Office 365 where these records weren’t fully configured. Emails get delivered when they send them, but their recipients see the “via” message up top. This “via” caveat looks especially weird when it’s on an email sent from one individual to another.
A more common area we see this get neglected is transactional emails sent from company websites. People commonly will configure form plugins like Gravity Forms, Contact 7, or Formidable to send notifications for lead submissions to be “from” some standard “info@ourcompany.com” email address. But if that server isn’t sending emails that have been properly authenticated, then those notifications are likely to have deliverability issues. Not ideal.
Even though a website plugin may let you change the “from” address of an email, it’s best to do so with caution.
Next Steps
I’ll admit, this stuff can be intimidating if you’re not particularly tech-savvy, especially when it comes to editing DNS records. But I promise it’s not that bad, and the payoff will be worth the headache!
Just create a task for yourself to have a conversation with whomever normally handles your IT to make sure things are good to go here. These things change frequently, so it’s entirely possible that your company may once have had everything configured properly, but that you just need a few updates or refreshers here.